
Downsizing our House - Full Time RV
We started downsizing our house on January 2020 - this was shot in February 2020 at the beginning of our downsize journey. Our goal was to go full time in a motorhome in 4-6 months, which turned out to be 10 months! Christy and Garrett talk about the apps they use to sell stuff, and the fact that the write-off for charity is no longer as good tax-wise as it used to be. In the middle of downsizing we also managed to replace both our Jeep bumpers!

6 Tips for RV Grocery Shopping
RV Grocery shopping can really be a challenge! When we lived in a house, life was much easier. We went to Kroger and Aldi every week, used coupons, and earned points for really cheap gasoline. Once we hit the road full time, we quickly had to change our strategy.
Of course, everyone has different eating habits, so these tips may or may not work for you. Here is how we would define our eating habits:
- We tend to eat relatively simple meals and whole foods with an emphasis on protein (see our fitness article to find out why)
- We eat a relatively repetitive diet - we would like to try other things but it makes tracking calories harder and we are pretty lazy!
- Our shopping trips tend to be larger and less frequent if possible (who likes shopping!)
Hopefully some of these tips will help you!

6 Tips for RV Grocery Shopping
We find this tips to be a good balance of saving money and getting quality food, which is very important!
Break Down Your Must-haves for RV Grocery Shopping
Everyone has food habits - items that are gotten every week and make the foundation of your eating.
Map Out Your Shopping Options
RV grocery shopping is very dependent on how long you are staying in an area - if you are just passing through, your options may be limited and/or you're too tired to bother. But if you're staying for a week or more, its worth a bit of time to find your shopping options. We try to keep it under 15 minutes from our campground if possible, because gas isn't free and we have better things to do than drive all over! Once we have mapped these out, we try to work in shopping with other errands or trips to the gym. This minimizes our driving and saves time.
- Identify shopping options - ideally you can get everything from one place, but that might not be practical.
- Optimize your shopping list - decide the best place to buy each item. Make substitutes if your favorite items aren't available or too expensive (Walmart Mio vs real Mio for example)
- Set a rhythm for grocery shopping - Be flexible, but having a schedule can help keep the fridge full and food fresh. We typically go to two different stores twice a week for the bulk of our shopping. But we have to make a quick run-in to Target or Publix to get our favorite frozen pizza - Newman's own!
Get to Know the Chains
Some chains are regional, and others are national. But the stores within a chain are typically very similar in layout and their sales strategies. Here are what we found for each chain we are familiar with:
- Kroger - Prices are generally lower than Publix, but higher than Walmart. They often have good "red tag" or "blue tag" sales if you buy in bulk. They have the best reward points program - if you shop there a lot you can also save substantial money on gas at their fuel centers (up to $1.00 per gallon).
- Publix - Generally better quality stuff, and often at a substantially higher price. A bushel of kale was twice the price of others! Best strategy here is to take advantage of their weekly 2-for-1 deals!
- Aldi - One of our favorites. Small, but great for stocking up on good quality food. We bulk-buy here alot! Their house brands are solid.
- Steaks (yum - and sirloin is cheap)
- Yogurt
- Cottage Cheese
- Almond Milk
- Bottled water
- Walmart - Cheapest and huge selection (and not just food). See next tip.
- Target - Surprisingly large selection of food and decent prices. Certainly works well in a pinch.
Don't be Afraid of Walmart
We will admit it, a little piece of us dies every time we step into a Walmart. There is just something about the big crowds and chaos that hurts your soul here. But if you want the lowest prices of any chain with the biggest selection, this has to be on your list. And they are in pretty much EVERY town in America. In our experience, they don't really have many killer sales, but every item seems priced consistently lower than any other major grocery chain. For example, we buy 5 dozen of eggs for under $4.00 - that's insane!
Buy in Bulk if You Can Afford the Space
Certainly it is a challenge to store large quantities of items in most RV's - and ours is no exception. But when we do our grocery shopping, we try to buy bulk to save costs. This can be a challenge for items such as paper towels, soda, toilet paper and other bulky stuff.
Don't Be Afraid of Mom and Pop Stores for RV Grocery Shopping
It is definitely worth knowing the chains when you are RV grocery shopping - when you are in a new area, the familiarity of a chain makes shopping quicker and typically cheaper. But you can often find unique items and get much better customer service at smaller grocers, especially in smaller towns.
Jeep Wrangler JL Bike Transport - 5 Best Options
Jeep Wrangler JL bike transport options can be tricky - you definitely have a couple challenges when you want to transport a bike or two.
The main disadvantage compared to older jeeps is the placement of the backup camera - it sits right in the middle of the spare tire! Older jeeps didn't have the camera, so bike racks could screw onto the spare tire bolt pretty easily.
The other challenge with a jeep is the tail gate - because it swings outward, any sort of rack that uses the hitch will make it impossible to open the back, which is super inconvenient. There are only a couple options that can swing away and avoid this problem.
So in our quest for our Wrangler rack, we put together a simple list of requirements:
- Handle two mountain bikes
- Allow the gate to be easily used with the bikes on or off
- The backup camera should be still useable when the bikes aren't mounted
- Not stick super far beyond the back of the Jeep
What We Chose
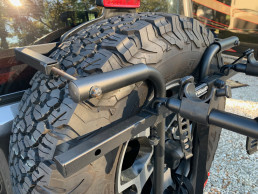
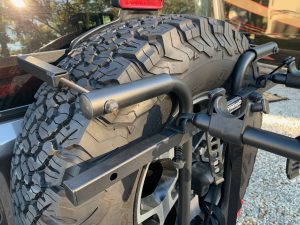
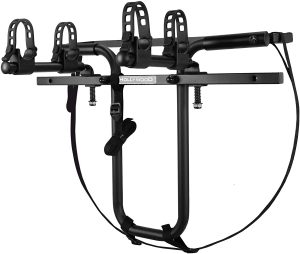
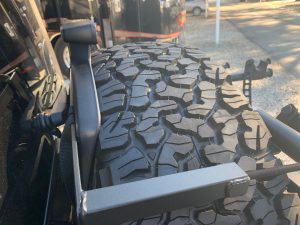
For us, it came down to the Hollywood Racks SR1 spare tire rack. This Jeep bike rack ended up being a pretty inexpensive solution and working out really well. We wish it could have been a bolt-on solution, but the straps turned out fine (although a bit messy, we could probably clean that up).
After two months of use, we just leave the rack attached to our Jeep and throw the bikes on the back anytime we want to take them to the beach. If we are going somewhere we can't watch the bikes, we throw on our Vulcan 9 foot chain with Viro lock on the bikes. Ironically, the lock cost even more than the rack itself - but it's a serious lock.
There is a little bit of rust on the bolts after a couple months, but nothing too serious. Honestly, we can't beat this for the price. If we wanted to move to E-bikes, we will also have to get a new rack, as the Hollywood Rack (like any other tire rack) just isn't strong enough to handle the weight.
Don't Want a Spare Tire Rack - Use a Hitch Rack
Hitch racks are more pricey, because they require more parts and have to be stronger since they stick further out the back of your jeep. It is definitely a downside to have the bikes stick further back - when we are set up to tow the Jeep with our 45 foot motorhome, any added length is not welcome! The . Obviously, you need to have a hitch on your Jeep for these to work. Most are adaptable to either 1.25" or 2" hitches.
The big challenge on the Wrangler is that spare tire. You have 3 options here:
- Get rid of your spare
- Use a hitch extender
- Use a swing-away
Getting Rid of Your Spare
This is certainly an option, and many Wranglers with 37's or bigger don't run with a spare anyway. But you need to have a way to deal with flats - fix a flat or some other option. And you will still need a swing-away or swing-down if you want to be able to
Hitch Extender
A hitch extender lets your bike rack sit further back on the back of your Wrangler. Make sure it has the weight capacity rating to handle both your rack and bikes.
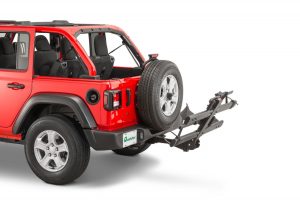
Swing-aways
A swing-away also extends your bike rack out from the back of your Wrangler, and has the added benefit of allowing the rack to swing away from the back of the Jeep, allowing you to open the back fully.
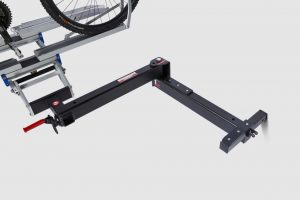
RackAttach
The RackAttach from 1up is a solid option for a swing-away. It is pricey - the cost was $400 with tax and shipping to our location.

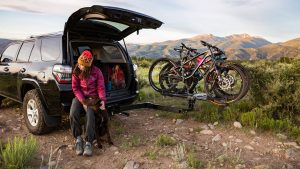
Hitch Racks
Hitch racks are a better option for heavier bikes. They are typically built far sturdier because they are hanging off the back of your hitch. The downsides pretty big also:
- Cost - usually much higher, some even approaching $1,000 or more by the time you are fully set up.
- Length - they put your bikes much further behind your jeep, especially with an extension or swingaway.
- Weight - Because they need to be more sturdy, the hitch itself weights much more than a spare-mount rack. If you have to remove it often, better hit the gym!
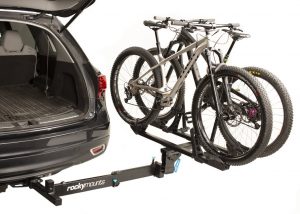
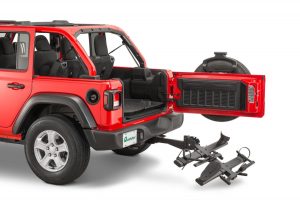
Rockymount Backstage
The Rockymount Backstage has a built-in 180 degree swingaway. Pretty heavy duty, and can handle up to 120lbs. This is enough to handle all but the largest e-bikes. They sell an 8" hitch extension will probably be necessary to clear your spare tire. One cool feature is it can swing down or swing away.

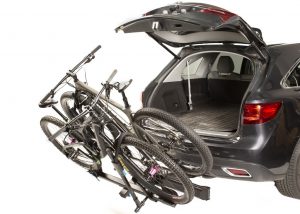
Quadratec 2-bike Platform Rack
The Quadratec 2-bike rack can be used on a stock Wrangler JL without an extender or a swingaway. It lets the back gate open by swinging down. If you have a bike in the inner position, it will seriously limit the amount you can open your gate.
Thule
Thule is pretty much the king of bike racks. They are also some of the most expensive racks made. They have a ton of different, models and the Thule Pro XT2 is a great choice for a Wrangler. It also drops down, but if you want it to move out of the way of your gate (especially loaded), you will need a swingaway.

Kuat
Kuat makes very nice a very nice swingaway rack in the NV 2.0. It does come in pretty expensive at $789, but it already has the swing-away built in which is really nice.

Wrangler Bumper Tow - Is It Safe?
When we started researching how to pull our Jeep, we immediately realized that a lot of decisions had to be made. It turns out there is plenty of options for tow bars, braking systems, and related components.
A little background on what we have and our goals. Over a year ago we bought a brand new 2019 Wrangler Rubicon Unlimited (the 4-door model). While we are not hard-core jeepers, we do have a background in motocross/dirtbikes, and definitely plan to do fun things with the Jeep too! While we don't want to go crazy with 37" tires and a lift kit (yet), we wanted to make sure our upgrades and our ability to tow the jeep with our motorhome didn't get in the way of our goals.
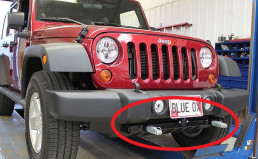
To that end, one thing we were concerned with was the use of a traditional base plate on our Wrangler. They stick out of the bottom of the front bumper, which reduces ground clearance. They also don't look that great!

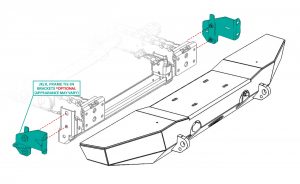
Pulling from the Wrangler JL Bumper
The solution is to pull from the bumper D-ring mounts. Unfortunately the stock bumpers of our Jeep doesn't even have D-ring mounts, so it was time to go bumper shopping.
The market is now saturated with JL bumpers! But a year ago, that was not the case. At the time, we looked at the following bumpers:
Rockhard Aluminum Patriot Series
Smittybilt XRC Gen2 Front Bumper
We liked all three of these - the Rockhard was especially interesting because it was aluminum, which cut the weight substantially. The Smittybilt was the cheapest of the bunch, which we also liked. But in the end, we went with the LOD bumper, both front (Signature) and rear (Destroyer). Why did we go with LOD? Lets go through a little story about the Wrangler JL.
Tale of the Wrangler JL
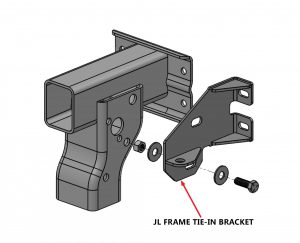
It turns out that Jeep changed how the bumper is attached to the frame with only two bolts on each side. Many people have questioned the strength of this setup if you tried to pull your 5,000lb jeep around by the bumper. It is actually quite the lively controversy on Jeep forums. Many people do it and don't seem to have a problem, but Jeep doesn't appear to support it. The base plate shown above gets around this by attaching directly to the frame of the JL. So we were worried about this - the last thing we wanted was our bumper ripping off while we were heading down the highway at 65 miles an hour. Nothing would ruin your day like a detached 50K Jeep playing bumper cars!
So how do we pull with our bumper and feel good about it? Turns out that LOD had an answer for this:
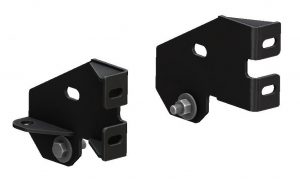
These brackets slide between your bumper and the frame, and then have a third bolt that then locks onto the frame. We felt that was a great solution for us. And

10 Things We Love For Our Motorhome
Living in our motorhome is very different than our house in many ways. Some things that make no sense in a house are critical (or at least super useful!) in a motorhome. Here are a few of these things.
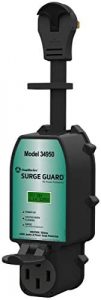
Surge Suppressor
When we move from camp to camp, the quality of provided utilities can vary widely. Since we have a really nice solar system with upgraded inverters, we want to make sure we do everything we can to protect them from fluctuations in the local quality of electricity. Low-quality wiring to the power post, bad connectors, or many other issues can cause brownouts, spikes, and other transients that could damage our equipment. We have a Southwire surge suppressor to meet this need. It is expensive but we feel it's worth it!
Lippert Waste Master
In our opinion, not all sewer hoses are created equal. The Lippert Waste Master is definitely more expensive than most (like $125 vs. typical hoses). But it has some nice features that we really appreciate. For one thing, it has a cam-lock for an attaching to the tank connector, instead of the traditional bayonet lock. This arrangement is SUPER easy to deal with and seems cleaner to me. On the other end is a gate valve and clear window to see the progress of your black/gray dump. The materials used for the hose seem noticeably better quality than most, and easily expand or contract as needed. They also have an extension kit (which also uses the cam locks, and for some reason is even more expensive) if you need to reach extra far to get to your sewer connection.

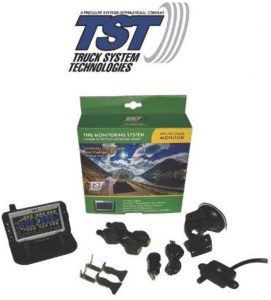
Tire Pressure Monitor System - TST 507 Color
Lets clear this up right away - We LOVE our TST 507 TPMS. We have a 50,000lb motorhome, with 8 wheels. And we drag a Jeep Wrangler with 4 more. So we have 12 tires rolling down the road anytime we move. Any one of these blows out and we could have anything between an inconvenience and a complete disaster. Our TPMS doesn't guarantee that we won't have a catastrophic failure of a tire, but it certainly gives us a fighting chance to know a tire has abnormally low/high pressure or a temperature extreme. Even a 30 second warning could make the difference between pulling over smoothly and this:
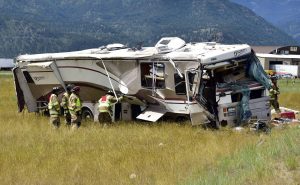
Our TPMS has worked flawlessly so far - a nice bright color display, sensitive alarms and a good quality case and mount system.
Outdoor Rug
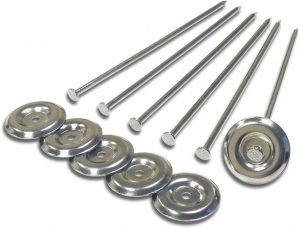
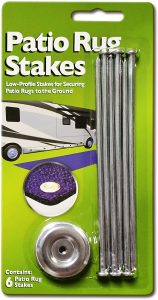
Seems like a simple thing, but having an outdoor rug like this one really makes the outside of our motorhome a bit nicer. Recommended! Our reversible mat is 9x18, it is also available in a smaller size.


We also got stakes to make sure the rug didn't blow away in the wind - these Prest-O-Fit ones worked well for us.
Brita Water Filter
A lot of people love their Berkey water purifiers - but we decided to go a different route. Brita makes a water filter that is pretty cheap, and gets the job done. The water we are getting in Tampa has a noticeably bad smell/taste, and the Brita fixes that.


Camera Equipment We Use
One of the biggest questions we get is what gear we use to make our videos and other content. The truth is, a lot of equipment! And it is ever changing. We are a bit geeky and like to stay pretty close to the edge of technology. Since we are not pro photographers as a profession, we don't have the absolute best gear money can buy. We use what we find to be a good balance between quality, function and value. What we use depends a bunch on where we are going and what we are trying to shoot. But the core gear covers our needs well.
When Quality is Paramount
When we need the best quality, our DSLR is our go to. A lot of people use Canon or Nikon, but we chose to go with Sony. Our Sony A6600 has been a great performer - a good combination of features and quality, without being super large.
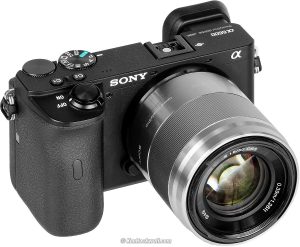
Because the best camera you have is the one you actually have with you! This camera is easy to fit into a small backpack, and bringing along a couple lenses gives a lot of flexibility. Our current Sony setup consists of:
- Sony A6600 Body
- Spare Sony Batteries
- External Battery Charger
- 18-135 Zoom Lens
- 10-18 Zoom Lens
- Sigma 16MM 1.4 Prime Lens
- Sigma 30MM 1.4 Prime Lens
For Action, B-roll and Flexibility
Nothing beats action cameras when you need to get an amazing shot - they are stabilized, waterproof, and super compact. And the standardized mounting system allows a lot of flexibility in where you actually put the cameras. We currently have 3 different action cameras - typically we stay pretty close to the latest versions of these since they have been improving so quickly.
When we Don't Have Another Camera
So often we don't have a dedicated camera with us - luckily we are lucky to each have an iPhone 12 Pro Max - these phones produce some of the best video and photos of any phone ever made, and easily work in many situations. The camera world has really changed in the last 5 years!

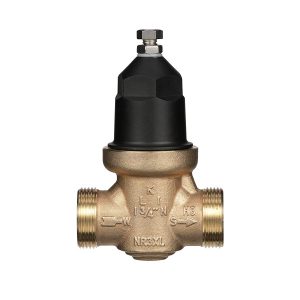
Water Regulation - Definitely!
When we lived in our house, we didn't think much about water. You call the water department, get your service on and thats about it. But the world is a bit different for travelers. The quality and quantity of water you get from any RV park or random water source can vary significantly. Because of this you will want to get a water regulator - The PEX and plastic pipes in your RV cannot withstand high pressures and you can end up with a serious leak and expensive damage to your home. And no one wants that! We went with a pretty cheap option - Around $22 when we bought it on Amazon: For our motorhome, we use the Kohree RV water pressure valve.
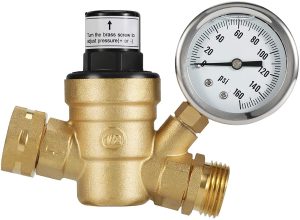
The reality is that most of the cheap regulators on Amazon are getting pumped out of a couple Chinese factories and are just that - cheap. This one seems to work fine, although our pressure has dropped at the tap (maybe we need to set the pressure higher, but it could be flow restriction issue with this valve). You could try to adapt a household regulator like this Zurn Wilkins - but that seems like wasted effort for something that is effectively a consumable at $22!

RV Toilet Paper - The Dirty Truth
Why is toilet paper a big deal in an RV? One very simple reason - if you clog up your black tank, you are going to have a very big mess on your hands. Unlike a house, every RV has a holding tank for your solids and liquids. When you clog a toilet in a house, you can usually fix it with a plunger, or an auger if it is especially bad. But in most cases, the issue won't be too bad because toilet paper flows through the smooth pipes in the house and out to the local sewer system (unless you have septic).
Contrast that to an RV, which essentially has a big plastic box that lets all that goodness sit and gum up together until you get around to emptying the tank. If your paper won't break down sufficiently, it will make a huge wad that will never make it out the tank drain. So it matters very much what you actually put down the toilet - wipes and paper towels are definite no-no's. And you need to be very careful with what kind of toilet paper you use. We considered quite a few options, weighing cost vs. ability to break down.
What we found was Cottonelle septic-safe toilet paper works perfectly fine (at least for us!).
It's only 1-ply but very soft and strong. We have a macerator in our master bathroom which helps break down the paper, but in the half bathroom we don't have a macerator and it's never been a problem at all.
Cottonelle Ultra CleanCare Septic-Safe

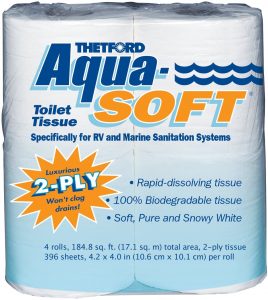
Thetford AquaSoft
Another septic-safe RV toilet tissue is Thetford AquaSoft but we found the cost is much more than Cottonelle and not as soft. We are sure its a great option, but unless we start having issues we are not going there! Thetford Aquasoft is marketed for RV's - designed to break down very easily. If you find that the Cottenelle isn't working, this could be a good option.
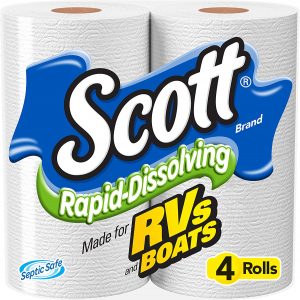
Scott Rapid-Dissolving
Scott Rapid-Dissolving is another popular choice for RV's. They claim it breaks down faster than the leading brand toilet paper. Scott Rapid-Dissolving is made for RV's but the rolls are smaller than regular toilet paper. We found you get much more paper with Cottonelle family mega rolls and it cost much less than Scotts.

RV Internet
One of the most critical things for many people is having solid internet while on the road. We couldn't imagine not having the ability to be connected - I have had some form of always-on internet since 1997! We did a lot of research, and came to the following conclusions:
We needed at least two internet providers
Hardware should be mounted and set up like a house (no mifi as service)
Unlimited data if possible (with streaming, we expect to use hundreds of gigabytes per month)
Our Internet Providers
At the time of this writing, there are 3 big players. AT&T, Verizon and T-Mobile (Sprint is slowly become T-Mobile). From all our research, the best coverage comes from AT&T and Verizon. We were fortunate to get a pre-paid Verizon unlimited plan before they stopped selling it. AT&T has been more of a problem, and we are doing a post-paid iPad plan and a 3rd party reseller (which has proven to be a nightmare).
Our Setup
A few critical pieces make up our Internet strategy. The core of our setup is a Pepwave Max Transit DUO router with dual cat-12 modems.
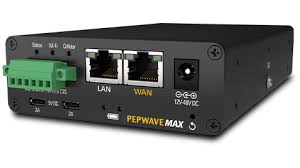
This router is a beast (with a price tag to match). Peplink is mainly in the business of providing commercial solutions - think buses, police, fire and any other business that needs Enterprise-level gear and support. This means they are usually behind the curve in technology (in these markets, rolling out cool new things isn't a priority), but usually everything is just rock solid.
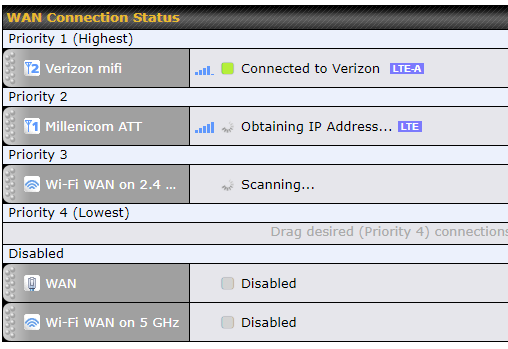
Having two modems (each with 2 SIM cards) lets this router do things that most cannot - it will test each connection and automatically make the fastest/best be the primary. For example, at the park we are currently at, we have Verizon as the primary, with a failover to AT&T. Even cooler, we also are connected to the parks wifi - which doesn't work very well but is available. That gives us a third option if the other options aren't working.
This is definitely somewhat of a luxury - you could have 2 jetpacks and make test both out when you get to a new location - or even change out the SIM's on the same jetpack. But connectivity is important to us, and portable jetpacks are not really designed to be on 24x7. And we found that this router does a better job compared to our Verizon 8800L with the Netgear MIMO antenna.
One reason we think we are getting better reception with this router is the fact we paired it up with a solid roof antenna, the Mobile Mark LTMG508 5in1 roof antenna.
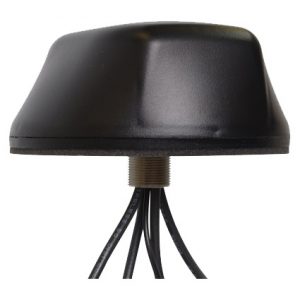
This antenna is smaller than it looks - easily fitting on most RV roofs. The only downside is you have to provide a ground plane - unlike the Poynting 5in1. For us this was no big deal - a small piece of galvanized metal from Home Depot worked perfectly. We ended up using a couple screws and sealant on top of our first AC unit. The antenna sticks just a few inches higher than everything else on our roof, and seems to be a good compromise of coverage and height. We hate to go ANY higher in height, but our Girard awnings create a metal ring around our entire roof (which came in handy for our solar install).

Temperature Monitoring - Vital for Your RV
We knew that moving from a house to an RV would require some changes - one of the biggest is being more diligent about your environment. Moving constantly and living in essentially a big black box guarantees that we will have wide swings in temperature throughout the year! Most of your things don't really care about these swings, but a few things do:
Pets
- Musical Instruments
- The Refrigerator
- Lithium Batteries
We have everything except pets, and wanted to be able to keep an eye on the coach as well as the basement (where the lithium batteries live). We wanted at least 3 sensors, and a display that we could set on the counter. In the end we looked at three different units:
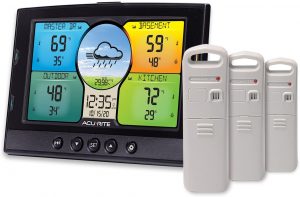
AcuRite 02082M Home Temperature & Humidity Station
The AcuRite 02082M Home Temperature & Humidity Station is a really nice looking unit - full color, comes with 3 sensors and cost around $50 at the time of this writing.
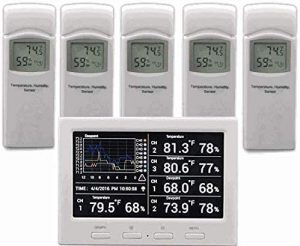
Ambient Weather WS-3000-X5
The Ambient Weather WS-3000-X5 is a powerhouse - comes with 3 sensors (around $85), or 5 sensors (around $100) and does temperature logging via an optional micro-SD card. The main unit can handle up to 8 sensors.
Keekit Outdoor Thermometer
The Keekit outdoor thermometer is pretty basic, lacking any sort of alarms. But it did have one advantage - when we bought it the unit only cost $31 with 3 sensors. It currently sits on our kitchen counter and monitors the freezer, the refrigerator, and the basement compartment where our batteries live. Although it isn't as fancy as the others, the price was right and so far has met our needs!